How to Maintain Your Holiday Trailer: A Comprehensive Guide
Adventure is almost here!
Owning a holiday trailer is a fantastic way to explore the great outdoors and create unforgettable memories with your loved ones. However, to ensure your trailer stays in top condition and provides you with years of enjoyment, regular maintenance is essential. In this extensive blog post, we’ll cover essential maintenance tasks such as bearings and grease, tires, lights, and more.
Avoid having to call a Tow Truck this summer by following these tips. But, in the event that something still goes array, Tuber Towing is available for you 24 hours a day 7 days a week and is fully equipped to help you with any issues you run into with a trailer.
Follow these tips to keep your holiday trailer in tip-top shape, and rest assured that you’ll be ready for your next adventure. Keep in mind some of these items require some mechanical knowledge and can be unsafe if you don’t know what you are doing. If you aren’t comfortable with performing any of these below see your local mechanic or RV repair shop.

1. Bearings and Grease
One of the most critical aspects of maintaining your holiday trailer is ensuring the proper lubrication of the wheel bearings. This will help prevent friction and wear, which can lead to costly repairs and even accidents.
Inspecting the Bearings
To inspect the bearings, follow these steps:
- Jack up the trailer: Safely elevate one side of the trailer using a jack, ensuring the wheel is off the ground.
- Remove the wheel: Unscrew the lug nuts and take off the wheel, exposing the hub.
- Remove the hub: Take off the dust cap, cotter pin, and castle nut to access the bearings.
- Inspect the bearings: Check for signs of wear, corrosion, or damage. If they appear worn or damaged, replace them immediately.
Greasing the Bearings
To grease the bearings, follow these steps:
- Clean the bearings: Use a clean cloth or paper towel to remove old grease and debris.
- Apply new grease: Using a high-quality and water resistant wheel bearing grease, pack the bearings generously. Ensure the grease covers all surfaces of the bearing.
- Reassemble the hub: Replace the bearings, castle nut, cotter pin, and dust cap. Ensure to use manufactured recommended torque.
- Repeat for all wheels: Perform the same inspection and greasing process for each wheel on your holiday trailer.
2. Tires: Stay Safe and Get More Mileage
Proper tire maintenance is essential for the safety and longevity of your holiday trailer. Regularly inspect your tires for signs of wear, damage, or low pressure.
Inspecting the Tires
- Check the tire pressure: Use a tire pressure gauge to ensure your tires are inflated to the manufacturer’s recommended PSI.
- Inspect for wear: Look for uneven wear patterns, bulges, or cracks in the tire’s sidewall or tread. Replace any damaged tires immediately.
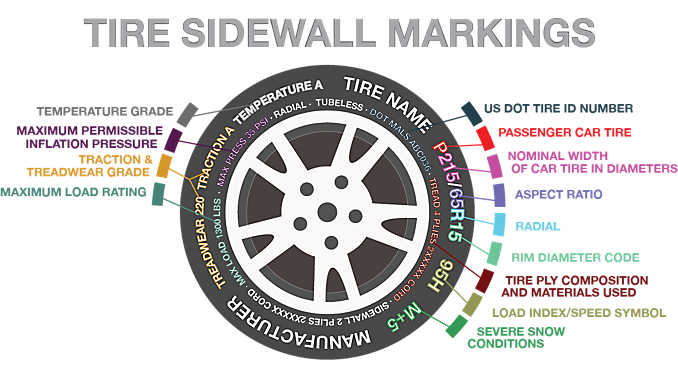
- Check the tire age: Tires have a limited lifespan, typically around five to seven years. Look for the DOT code on the sidewall, which indicates the week and year the tire was manufactured. Replace any tires that are past their recommended lifespan.
3. Lights
Ensuring your holiday trailer’s lights are functioning correctly is crucial for safety on the road.
Inspecting and Replacing Lights
- Test all lights: With the help of a friend or family member, test your trailer’s brake lights, turn signals, and running lights.
- Replace any faulty bulbs: If any lights are not functioning, replace the bulbs with the appropriate type.
- Inspect wiring: Check for any damaged or frayed wiring, and repair or replace as needed.
4. Intervals
Following manufacturers recommended maintenance plan is best, however not all manufacturers make their’s readily available.
Below is a chart of standard maintenance intervals for travel trailers. Keep in mind that these intervals are general guidelines and may vary depending on your specific trailer make and model. Always consult your trailer’s owner’s manual for the manufacturer’s recommended maintenance schedule.

| Maintenance Task | Interval |
|---|---|
| Bearings and Grease Inspection | Every 10,000 miles or annually, whichever comes first |
| Tire Pressure Check | Monthly |
| Tire Rotation | Every 5,000 miles or as recommended by the manufacturer |
| Brake System Inspection | Every 5,000 miles or annually, whichever comes first |
| Hitch and Coupler Inspection | Every trip or quarterly, whichever comes first |
| Suspension System Inspection | Every 5,000 miles or annually, whichever comes first |
| Frame and Body Inspection | Annually |
| Seal and Weatherproof Inspection | Every six months or as needed |
| Exterior Cleaning and Protection | Every three months or as needed |
| Interior Cleaning and Sanitizing | As needed |
| Propane System Inspection | Annually |
| Smoke and Carbon Monoxide Detectors | Test monthly, replace batteries annually |
| Fire Extinguisher Inspection | Annually |
It’s essential to perform regular checks and maintenance on your travel trailer to ensure it remains safe, functional, and ready for your next adventure. The chart above can serve as a starting point for your maintenance routine, but always consult your owner’s manual for specific recommendations from the manufacturer.
5. Set up at Site:
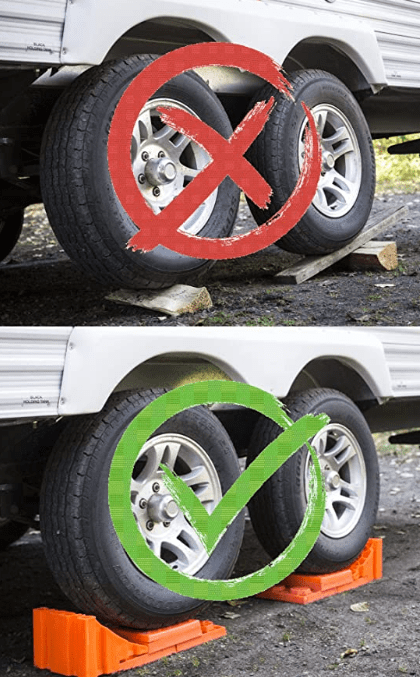
Last but definitely not least. To help protect your tires from the elements while maintaining the levelness of your trailer. Use levelling blocks to ensure your trailer is on level ground. This not only makes your stay much more comfortable, but it’ll also ensure your plumbing is doing it’s job effectively in the trailer and won’t get backed up.
By following these guidelines and performing regular maintenance on your holiday trailer, you’ll ensure it remains in excellent condition for years to come. Don’t forget to provide us with pictures and details to match the descriptions of inspecting and viewing each topic covered in this blog post. Happy travels!

