How to Safely Change a Tire on the Side of the Road
So, you’re cruising down the highway, minding your own business, and then suddenly – BAM! Your tire decides it’s had enough and goes flat tire. Now you’re stranded on the side of the road, faced with the daunting task of changing the tire. But don’t worry, we’re here to help you out with a step-by-step guide on how to safely change that pesky tire.
Step 1: Call Tuber Towing (Seriously)
Okay, we know what you’re thinking: “Really? The first step is to call a towing company?” Well, hear us out. Calling Tuber Towing is not only a fun way to start this guide, but it’s also the safest bet for several reasons:
- We have an exceptional response time, so you won’t be stranded for long
- We provide Traffic Control to ensure the team member changing the tire AND YOU are SAFE while working on the side of the road
- Our trained professionals will change your tire quickly and safely
- You can stay inside your car, protected from the elements and oncoming traffic
- You get to enjoy a friendly chat with our skilled team members. Who doesn’t love some good conversation?
Buuuuuuuut, if you’re still determined to tackle this task on your own, here are the steps to safely change a tire on the side of the road.
Step 2: Find a Safe Spot to Pull Over
Before you start wrestling with your tire, make sure to find a safe spot to pull over. Look for a level, stable surface that’s far away from traffic. If possible, pull off onto the shoulder or an exit ramp. Gravel, or surface at an angle won’t provide a solid or safe point your your jack to stabilize itself on. Not to mention, the some of the most common injuries while working are caused by bending, twisting and lifting, uneven surfaces make your footing much less stable. And remember, turn on your hazard lights to signal to other drivers that you’re stopped.
Step 3: Gather Your Tools
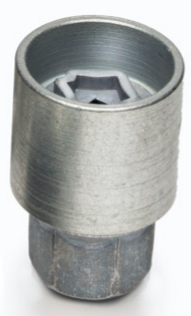
Now that you’re safely parked, it’s time to gather your superhero tools. You’ll need a lug wrench, a jack, and, of course, your trusty spare tire. If you have locking lug nuts you’ll need that annoying little key the tire shop always forgets to push back. Don’t be that person! Check your glove box, trunk, center console. It can look a little somethign like this. Oh, and don’t forget a pair of gloves if you want to keep your hands clean!
Now would also be a good time to locate and get your spare tire out. KICK IT! Not out of anger, but to make sure it has air in it! Set it beside where you will be changing the flat to reduce time and shaking of the vehicle while it’s on the Jack.
Step 4: Loosen the Lug Nuts
Using the lug wrench, loosen the lug nuts on the flat tire. Remeber to use your arms or body weight, NOT YOUR BACK! Turn them counterclockwise, but don’t remove them just yet. We’re only looking for a bit of wiggle room here.
Step 5: Jack Up Your Car
Find the correct jacking point on your car (check the owner’s manual if you’re unsure) and start raising your vehicle with the jack. Keep going until the flat tire is a couple of inches off the ground. A little pro tip: Make sure your car is in park and the parking brake is engaged! For and extra level of safety, put a rock or piece of wood in front and behind of a tire you aren’t changing.
Step 6: Remove the Flat Tire
With your car safely raised, it’s time to remove the flat tire. Unscrew the lug nuts completely and gently slide the tire off the car. Try not to let it roll away – we don’t want any rogue tires on the loose! I’ts best to lay it flat on it’s back, both to protect the rim face and to make it stay put!
Step 7: Install the Spare Tire
Grab your spare tire and align it with the wheel studs. Slide it onto the posts and start tightening the lug nuts by hand. Make sure they’re snug, but don’t use the wrench just yet.
Step 8: Lower Your Car and Tighten the Lug Nuts
Slowly lower your car back to the ground, and once it’s stable, use the lug wrench to tighten the lug nuts in a star pattern. This ensures even pressure on the spare tire. Tighten it, tighten it like you mean it. Unless your a professional weight lifter it is unlikely you’ll be able to tighten them enough to hurt them… Which would you rather, a tire falling off, or sore muscles?
Step 9: Pack Up and Hit the Road
Gather your tools and the flat tire, pack them in your trunk, and give yourself a pat on the back. You’ve just changed a tire on the side of the road like a champ! But remember, the spare tire is just a temporary fix, so don’t forget to visit a tire shop soon to get a proper replacement.
Step 10: Reflect on Your Achievement (And Maybe Call Tuber Towing Next Time)
As you drive off into the sunset, take a moment to appreciate your newfound tire-changing skills. You’ve tackled a task that many people dread, and you did it with humor and grace. But, if you’d rather avoid the hassle in the future, remember that Tuber Towing is always here to help with a friendly smile and top-notch service. Stay safe out there, and happy driving!


Pingback: What To Keep In Your Car's Emergency Kit